http://www.facebook.com/profile.php?id=1738290019

My Facebook profile

WELCOME TO MY BLOG

Here you'll find some info on Ducati repair and modifications along with photos. I've got stuff for sale too, so check out the older posts. Please leave comments about anything you see, good or bad. Thanks for looking, Steve

Search This Blog

Thursday, May 26, 2011

Steps to Balance.


Here's the naked wheel on the balancer to find the true heaviest spot.


The two red dots on the tire represents the lightest point- mount the tire with these at the "true" heaviest point on the rim (or the valve stem if you didn't check the rim first).


The first thing to do is set the wheel (from now on "wheel" will refer to the rim/tire) on the balancer, making sure the rod or axle is level, and give it a good spin. Position yourself so that your can "eyeball" the top of the tire as it spins and use a reference point in the distance to check for any up and down movement, also check for any side "runout". If the wheel has a wobble it could be a slightly bent rim or tire that is not seated properly on the rim. If everything is true, continue on.
Slow the spinning tire until it settles to a stop. Note: As you become better at the process you'll get a feel for how much weight to start with to get close. The heaviest spot is now at the bottom (6 o'clock). Add a strip of weights (as shown below) opposite this spot (12 o'clock), then move it to the 3 o'clock or 9 o'clock (below) position and let it go. If it begins to drop to the bottom, cut a little bit of the strip off, you'll get the hang of how much to remove by the speed that it drops. Keep playing with the length of the strip until it stays there or moves very little. I like to position the wheel at different spots and check for movement. When your sure that the weight added compensates for the heavy point on the wheel, give it a few small spins and make sure that it stops at random spots. If it stops and then changes direction or speeds up it's still off a little and you'll have to make adjustments.


Once you're positive that you have a nice balanced wheel, carefully remove the weight strip, clean the rim and apply it to the rim. If it's a wide rear wheel try to get it directly in the middle of the rim or if it's a narrow rim and you have a lot of weight, divide the strip in half and put an equal amount on both sides.


Before removing the wheel from the balancer double check your work.


There it is.....a pretty straight forward technique for checking your wheels for trueness and getting a perfect balance, just like the professionals.



Thursday, May 19, 2011

Tire Balancing 101

Here's where I got the static tire balancer I've been using for years. Marc makes excellent stuff for mostly BMW's, and this balancer is very well made and reliable.


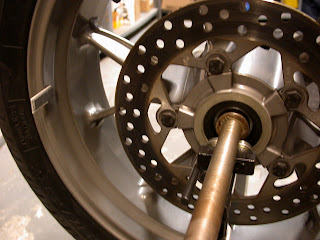
Here's some of the tools and attachments I use for balancing different wheels. The top rod and cones are for the single sided swingarms for Ducatis. The middle is a universal style I had machined that fits many different sized wheel bearings. The lower one and the round aluminum adapter (below to the right of it) is a Marc Parnes item and is for single sided BMW wheels.


Note: This balancer is designed to use the stock axles also.


Then you'll need stick on wheel weights (shown are car type), a small level (I'll explain that later), cutting pliers and brake cleaner for removing the old weights.


Here's the unit with the rod and cones I used to balance the Ducati wheels and tires. Note the vertical adjustment of the left bearing support, it's used to compensate for axles that are large on one end (usually front). Also notice that the right bearing support is adjustable for width of the wheel/tire combo, this is handy when setting the positions of the bearings on the axles so there is no interferance when spinning the wheel. Marc also sells a rod setup that attaches to his balancer that is used to check runout of the wheel.


Rain tires mounted and ready for balancing.


Tip 1. To balance a tire using the minimum amout of weight first check the balance of just the rim. Tires are checked for balance at the factory and marked for the lightest spot, this spot should be positioned opposite the heaviest point of the rim (which many, mistakenly, think is the valve stem). Note the yellow dot on the rim above, this is the "true" heaviest point of the rim.


Now notice the yellow dot on the rear wheel in relationship to the valve stem (preceived heaviest spot). As seen, there can be quite a difference between these two, in this case almost 180 degrees. The yellow dot is the point I use as the heaviest to balance the wheel/tire. You'll use less weight with this method, although I realize it takes a little more time, but seeing as I've mounted and balanced all my own tires for years, I feel it's worth it. Trust me, most shops will never make the effort to do this and you'll end up with a 4 inch strip of weights on the wheels, AND, they would probably not even bother to seperate them for both sides of the rim. That's tip 2. If you need quite a bit of weight it should be divided in two strips and applied to both sides of the rim.


Full Floating Buttons

The finished product. Notice also how I've cleaned the rotors with Brakleen and a grey Scotchbrite pad. I also deglazed the pads using 180 grit wet/dry sandpaper on a piece of tempered glass.


The old "semi-floating" buttons need to be ground off from the backside.


After the new buttons are installed, I add a litle epoxy to the clip on the back just to be safe.


Friday, May 13, 2011

MIT eSuperbike

The bike uses two electric motors on both sides, mounted low on aluminum plates. I believe they said it's a 100 volt system. The battery packs are mounted around the engine area. It uses the same batteries as a laptop computer. It can be charged in a couple of hrs. but for best range and power it needs an overnight charge. They will limit the speed to around 75 mph for the IOM race. The race is one lap and last year many entries didn't finish.
The bike was at NHMS for a Boston Moto trackday on a Monday and was scheduled to be shipped to the Isle Of Man on that Wednesday for the race.

Once the bodywork is mounted it should look pretty much like a BMW S1000RR trackbike.

MIT e Superbike

The guys behind this effort gave us a brief talk at lunch about the specs and work involved with the bike. The bike has been run on the dyno but this was the first time it was ridden on the track.
BMW donated a new S1000RR superbike for the MIT eSuperbike. The finished bike weighs about 60 pounds more than the stock bike.
The dash. The bike can be started remotely from a laptop.
This battery disconnect is required for the IOM race. It's mounted in the tailsection.
All this stuff is mounted in place of the tank. The bodywork was yet to be finished.