
DUCATI WATER PUMP FAILURE Trying to find a reason and cure!! DUCATI WATER PUMP FAILING Authors Steve Methia Published
Creative Commons Attribution 3.0 License
Version 14
Last edited: Jul 30, 2008
Exported: May 3, 2012
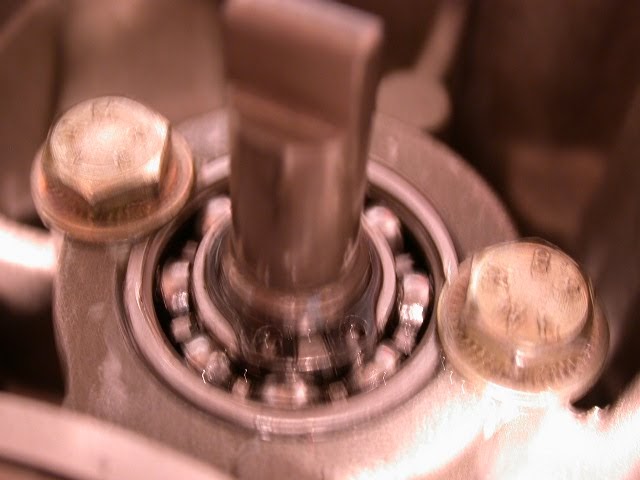
So here's some info on my attempt to remedy a problem I've had with the water pump impeller breaking on my 1998 Ducati 748 track bike. This picture is from the first time it broke, I think it was in Oct. of 05. The replacement was the impeller that broke this month (July 08) during a trackday at Loudon, N.H.
The bike was running as high as 240 degrees and would not cool to below 170 between sessions. I even re-installed the radiator fan, but it didn't help because the coolant was not circulating. NOTE: I usually have to put tape over part of the radiator, even in the summer during track days, just to keep the temp in the 180 range- I've found this is where the engine runs best and makes the best power. Late in the
day I decided to pull the water pump (WP) cover and check the impeller....sure enough....I found what looks like the above pic. I couldn't get another part that day, so my fun was done!
Creative Commons Attribution 3.0 License
Version 14
Last edited: Jul 30, 2008
Exported: May 3, 2012
So here's some info on my attempt to remedy a problem I've had with the water pump impeller breaking on my 1998 Ducati 748 track bike. This picture is from the first time it broke, I think it was in Oct. of 05. The replacement was the impeller that broke this month (July 08) during a trackday at Loudon, N.H.
The bike was running as high as 240 degrees and would not cool to below 170 between sessions. I even re-installed the radiator fan, but it didn't help because the coolant was not circulating. NOTE: I usually have to put tape over part of the radiator, even in the summer during track days, just to keep the temp in the 180 range- I've found this is where the engine runs best and makes the best power. Late in the
day I decided to pull the water pump (WP) cover and check the impeller....sure enough....I found what looks like the above pic. I couldn't get another part that day, so my fun was done!
I've since asked around to Ducati experts and on forums and it seems that this problem is rare, so I decided to dive into it this time with the goal of not just replacing parts, but trying to get to the bottom of the problem and maybe help others that may have the same thing happen.
Here's the new impeller. It comes complete with the spring loaded seal assembly and is only $175!!! YIKES.

 BTW: I don't have a pic of the old impeller, but the blades looked like the tops we're ground down slightly and one blade had a hairline crack in it. I couldn't tell if that damage was done during normal operation or after it blew apart and spun around in the cover....SO.....the following experimentation....
This band (outer edge, top of photo) in the WP cover made me think that maybe the blades were hitting there. I was informed by someone that has worked with turbines that no part of the impeller should ever hit the cover or any other part of the assembly.

You'll noticed that the AC has been rashed from a previous crash but that the WPC has not been damaged. I mention this because I originally thought that maybe the WPC had been pushed in somewhat.
Using some black water-based craft paint I carefully painted the inner surface of the AC behind the impeller…
And the inside of the WPC.

Once the paint dried, I installed the impeller, gasket and WPC and torqued the screws. Then I made this little setup you see attached to my cordless drill to spin the impeller from the backside of the AC. It's made up of some clear tubing that I slid over a drill bit. I then slid this over the end of the impeller that would normally mate with the drive gear of the engine.

Here you see the tool attached to the impeller shaft from the backside (without the drill attached).


I then spun the impeller with the drill forward and backward at about 1500 rpm (guess) to be sure that I was going the right way. The I disassembled everything to take a look. Here's what I found: The backside of the impeller (toward the engine) was hitting the AC slightly in a couple of spots. Notice the paint scraped off at the outer (raised) edge.
Here you can see some of the paint on the backside of the impeller.
NOTE: I can't be sure that this didn't happen just by assembling the impeller,as you have to depress it slightly to install the snap ring, but I went by the assumption that it was from rotation. I didn't see any evidence of the blades contacting the WPC. I wondered though, how close the blades were to the inside of the cover....SO....I decided to continue with the experiment. Setting up a dial indicator on the backside of the AC I set it on the end of the impeller shaft, snap ring in place, and zeroed the gauge.
NOTE: I can't be sure that this didn't happen just by assembling the impeller,as you have to depress it slightly to install the snap ring, but I went by the assumption that it was from rotation. I didn't see any evidence of the blades contacting the WPC. I wondered though, how close the blades were to the inside of the cover....SO....I decided to continue with the experiment. Setting up a dial indicator on the backside of the AC I set it on the end of the impeller shaft, snap ring in place, and zeroed the gauge.


Next, I carefully removed the snap ring and measured the distance the shaft dropped until the blades made contact with the cover.
The shaft moved almost .035". (Yes, I readjusted the dial from the previous picture). This leads me to believe that there's no way the blades are going to hit the cover, even if the expansion rates of the aluminum cover and plastic impeller were different! So, I decided to concentrate on the area behind the impeller, and try to make some clearance. My bike is a 1998 Ducati 748 with the early style 4 bolt WP cover (same as the 916). Two of the holes in the above pic are for alignment pins that are removed.
The reason I'm stating this is because the impellers are different numbers and the setup of the bearings and spacer that support the impeller in the cover has changed from year to year and model, according to the Haynes manual which I used. This means that you must pay close attention to all the pieces and how they are assembled! AND...to make matters more complicated, in my case, I used one Ducati bearing and one SKF bearing although they should be the same.
Anyway, here's how I went about getting some clearance behind the impeller. First I disassembled the bearings and spacer from the cover.

I thought maybe this "stack height" might be too high because of the different bearings or something??? so I decided to gring the spacer down a few thousands and make sure the bearings were well seated in the cover.
Here's a better picture of the bearings installed after the modification.....really can't see any differnce though.
Then, I gained a little more clearance by carefully running the back side and outside edge of the impeller blades on the grinding wheel to take a little material off.
I reassembled everything with the scratched painted area touched up and spun it again with the drill.
This time when I disassembled it I saw that no part of the blades were hitting anything!!! So I put the whole thing back together on the bike.
I've run the bike with new coolant and checked for circulation and/or overheating and everything seems fine.
I hope it stays together for the next track day!!

When I finished with the above write up I realized I had more info about this subject on my Blog, so here it is.... The first little story relates to the wonderful life of a "shade tree mechanic"!!! Thursday, August 2, 2007 This story starts about 15 years ago when I lost my garage, but that involves a divorce, so let’s just leave that for another day. The present event that had me "mentally melting in the sun" started with a routine replacement of water pump seals and bearings. All was going swimmingly; I had the disassembled bike in the hot trailer, the engine case baking out on the deck and the bearings cooling in the freezer. The basement room was set up for bearing installation because it was nice and cool and well lit. Nice, let’s go! Step one, grab the hot engine case from outside and deposit it downstairs on the bench next to the correct sockets for driving in the bearings. Next, grab the chilled bearings from hibernation on the Bubber Burgers, don’t forget the spacer on the kitchen table. Right, got it…downstairs with ‘em. Oh damn, forgot the hammer, it’s in the trailer..Outside again!! I easily tapped the cooled sealed bearing into the cover and went to grab the spacer for installation. "What! Where the hell’s the spacer?" I said out loud, I had just carried it down from the kitchen. I looked all over the bench, under the bench, on the floor, in my pockets, on the steps up to the kitchen, back in my pockets, then on the kitchen table. Alright then, it’s not in the obvious places, so I looked outside on the deck and on the ground between there and the trailer, in the trailer, again in my pockets (isn’t it amazing how you’ll recheck someplace when you’ve lost something, like it gonna instantly reappear there), still no F-ing spacer!! Now, I’m sweating from the heat and humidity, the many trips outside, up and down the stairs and from being on my hands and knees with a flashlight. Where the F is that spacer? At this point I’m checking places I didn’t even go with it. Okay, I think, I’ll just take a deep breath, try to relax (like that’s going to happen at this point) and retrace my steps. So retracing my steps led me from the freezer to turning around and grabbing the spacer from the table, I put them all in one hand and brought them down to the work bench, went out to the trailer for the hammer, then it was gone when I got back. Well, now the bearings were defrosting so I took them back to the freezer until I found the F-ing spacer. I even checked the pictures that I took of the parts, just to make sure I wasn’t losing my mind, and it really did exist. After looking for an hour and a half and using every swear word I could think of, I decided I was done. That’s it….it fought me and won , I surrendered! I might as well just put all the parts away, order another "F-in spacer"- as it was now called, and get going to my real job. I started to load everything into a plastic bag and removed the bearings from the freezer to throw in. But, just as I was about to put the large bearing into the bag I noticed that it was sealed on one side! What the F—K! I know that I removed the seals from that bearing…..well…..can you guess what was sitting perfectly between the inner and outer race? You get three guesses and the first two don’t count. Yep, that "F-ing spacer" sat perfectly there in the bearing. It was there when I carried it downstairs, but the bearing flipped to the other side when I put it on the bench so I didn’t see it (yes, I never turned it over!!) It stayed for the trip back upstairs to the freezer, spacer side down, so I still didn’t see it when I looked a thousand times. Unbelievable??? Maybe, but true. Tomorrow I finish installing the bearings and get my ride back together. Wish me luck. Someday I’ll tell you the story about when my dog ate my carb floats…..I’m serious! 'Lidz
No comments:
Post a Comment